Last Updated on June 28, 2020 by admin
How To Create A Blog On Blogger Step By Step

Blogging for Beginners : Create a free Blog site. How to create a blog? Tutorial for create blog. How To Create A Blog On Blogger Step By Step? How do I create a blog site? Create moblie blogs. blog creation tutorial on http://www.blogger.com
As you may know, Google BlogSpot is the easiest platform to create a blog for personal or business use. A blog can create by using BlogSpot very easily without any kind of coding knowledge. Being a Google company, you can continue blogging without any hesitation. If you are new to blogging then you must start blogging by create a blog with Google Blogspot.
There are many types of online Google products that you can’t use from all over the world. This means that Google never releases all their products to all countries. Even Google has a lot of products that do not have the opportunity to buy from different countries for money. Google BlogSpot is a product that Google has made open to all countries. Google BlogSpot is directly connected to Google’s servers, so there is no need to worry about service errors.
READ : How to Create a Free Website with Free Domain and Hosting?
How To Create A Blog On Blogger Step By Step
You Know , Now a days everyone want to create a blog. and want to share his or her feelings, experiences , knowledge and talent trough internet. so thinking to create a blog on blogger is a good idea. because its free to create a blog on blogger.
So Here We will Guide You, How To Create A Blog On Blogger Step By Step.
This is full guide for Beginners.
Free Tutorial for Beginners to start a blog Blogger.
How to create a blog using BlogSpot?
First you need to create a Gmail ID.
Then login to your Blogger Account with your Gmail ID.
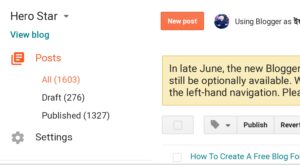
Then you will see like the image below.

Click on the yellow button in the image above Create New Blog.
After clicking on Create New Blog, it will show like the image below.
Enter the name of your blog in place of the title above.
Enter the address of your blog in place of the address. It must be completely unique. Everyone will find your blog through this address.
Then you can see the pictures in the theme last right Corner, these are different designs of BlogSpot Theme. From here you can select any one of your choice.
Then by clicking on the latest Create Blog, your blog will be created automatically.
I don’t think creating a blog with Google BlogSpot is as easy as creating a blog on any other platform. A blog can be create with just a few clicks through a Gmail ID. For those who are new to the blogging world, they must create a blog with BlogSpot. Now we will discuss all the parts of the blog.
Blogger Dashboard Introduction: How To Create A Blog On Blogger Step By Step
1.View Blog:
You can visit your blog directly by clicking here.
2.Posts:
Here you will see the list of all the posts you have made so far by date. If you want to delete any old post or make any change, you can do it from here.
3. Stats:
Find out more about your blog traffic here. It’s almost like the Overview option. However, from here you will be able to know many more details including how many views on a post, what kind of browser visitors used to visit your blog, from which countries visitors visited your blog and which operating system they used to visit your blog, etc.
4.Comments:
How many comments have been made on a post on your blog, which comments are used to delete, approve comments and delete spam comments.
5.Earning:
If your blog is good quality and has a lot of visitors, then you can earn money by using Google Adsense Approved Advertisement on your blog. To get Adsense Approved, your blog must be in Google adsense Supported language. we will discuss this in detail later.
6.Pages:
There are usually various cleansing songs about the blog. For example, different pages are created about your blog, about yourself, about the privacy policy of the blog, contact pages, etc.
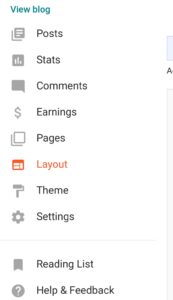
7.Layout:
This Layout is an important part of the Blogger template. Using it, you can use different types of gadgets in your blog. It also plays an important role in sorting blogs.
8.Theme:
This is the life of a blogger. You can’t think of a blog without it. You can manage the entire work of your blog by editing it. All you have to do is design and change your blog.
9.Settings:
We all understand this simple word. So I don’t want to say much. From here you can change the name of the blog, the description of the blog and change the blog address and much more.
10.Reading List:
Here you will subscribe to the blogs and show their posts. If you haven’t subscribed to any blog, Google will show posts on different blogs.
Help: If you need to contact the Blogger developer team for any reason, you can report your problem by clicking here. The Google Blogger team will notify you via email.
Introduction to new posts and blog posts:
How To Create A Blog On Blogger Step By Step
The image you see above is a post option on the Blogger Dashboard. Clicking on the New Post option indicated by the arrow will show the Post Editor part like the image below.

You can also see for yourself the remaining four parts.
The top part of the image above is the place to write the Post Title. Here you have to write the title of your blog post.
Then you can see all the Html and Css codes of your blog post by clicking on the part which you see as Source Code. If you have no experience with Html and Css then there is no need to work in this part.
As you can see in this part called Post,
You can see in this part called Post that anything you want to write in to post. Express your thoughts freely here. It looks a lot like MS Word. You can better organize your post by using the menus here. You can understand this part by yourself.
If you click on the Publish button in the picture above, your post will be published immediately. You must set some things before publishing the post.
Labels:
In the second part called Labels, you can give a name to match the subject matter of your post. This will show posts of the same label together.
Permalink :
You can enter the Url address of the post in Permalink. Everyone will find your post through this link.
Search Description :
You can write the details of your post here in a very short way as you can see the last “Search Description” . This is also very important for search engine optimization.
There are also some more parts. But even if you don’t do these, there is no problem. That’s why I did not discuss it here.
Introducing Stats on the Blogger Dashboard : How To Create A Blog On Blogger Step By Step
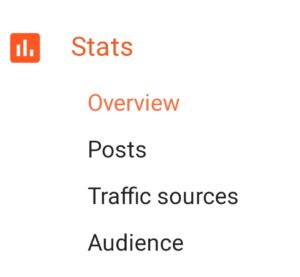
Stats: Clicking here will show like the image below. This option allows you to know how many followers your blog has, how many pageviews, where visitors are coming from, and so on.
Stats: There are 4 more options under Stats. See details about it below-

Overview: This option is just like the previous Overview. Just get some extra options about Post View and everything else is like the previous one.
Posts: Click here to see the image below. From here you can know the details about Posts and Page View i.e. how many times a post and page has been viewed. Here you will find some options of days, weeks and months on the top right. You can learn more details using these.
Traffic Source: This simple word means you can understand yourself. From here you can know from which sites visitors are coming to your site. You can also find out more about what kind of keyword visitors are using to enter your site from search engines. See the image below-
Audience: From here you can find out how many people visited from which country, from which type of browser your site is being visited and what kind of operating system your site is being visited. See below-
Blogger Layout Introduction: How To Create A Blog On Blogger Step By Step :
If you click on the Layout option from the Blogger Dashboard, you will see the Blogger Layout as shown below.

This is the layout part of every blog. However, the Blogger Layout may be a little different depending on the template.
The part Add a Gadget in the image above is the Blogger Gadget button. These shots can usually be on the right, top, bottom or even left side of the Blogger Layout. Whenever you add a new Widget, you have to click on this button. After clicking this button you will see the image below.

One of the options you can see in the image above is Gadgets. You can add them to your Blogger by clicking on them. Clicking on any one of these will bring up another box, clicking on Save will add the gadget to your blog.
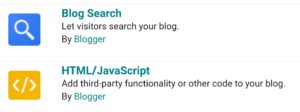
The image you see above is also a Blogger Gadget. The reason it is shown differently is that it is the most used of the Blogger Gadgets. If you want to add a custom widget to your blog, you can do so.
Blogger Theme Introduction:
How To Create A Blog On Blogger Step By Step

If you click on the Theme option from the Blogger Dashboard, you will see a preview of the blog like the image below. The two previews you can see here are one for computer and the other for mobile.
Here you can see the two options under Live on Blog (Customize & Edit HTML) using the two options you can customize your theme as you wish.
If you click on the Edit HTML button, you will see all the web code of your template as shown below.

This is the coding section of your Blogger template. Here you can customize your Theme using Html, Css and JavaScript. For this you must have an idea about web design. In a word, you can do whatever you want with your blog here.
Then there is the Customize option. This allows you to customize your Theme without any coding knowledge. However, there are some limits, you can not do anything here beyond this limit. Click on the Customize option to see the image below.

Under the Customize option, you can see 5 more options. You can use these to customize your template.
The first Theme option in the image above, on the right side of the Theme of different designs. If you wish, you can use different themes by clicking here.
How To Create A Blog In Blogger Step By Step

You can understand the simple meaning of the word Adjust Widths. You can only change the width of your theme from here. There are two options here. Entire Blog allows you to change the width of the main side of your blog and the right sidebar from the right sidebar. You will see a preview of the change below. This will make it easier for you to adjust.
There are different types of layouts for blogs. For example, there are two-column, three-column and even four-column layouts. You can use it as you wish. You can easily understand this by looking at the layout images.
There are several more options under the latest Advanced option that you can see, which I can’t describe separately now. These allow you to change the different colors, fonts and styles of your theme. You can easily understand when you see these shots. Even then, if anyone doesn’t understand or has a problem understanding, you can let us know by commenting. We will try to solve your problem.
After changing all the customize options described above, you have to click on the Apply to Blog button. This will save your changed options. You can see it at the top right of the blog.
If you look closely, you will see that the first image of the Blogger theme has a mobile theme. Click on the gear icon of the mobile theme to see the image above. This is the settings for the mobile version of your template. From here you can change different designs of your mobile version.
Blogger Settings Introduction Part-1: 6

1. Blogger Basic Settings Introduction:
Basic – There are 3 more options under it. You can write the name of your blog in the title, a short description about the blog in the description and you do not have to do anything in the Privacy option. Because it is set by default. So you do not have to do anything in this option.

Publishing – There is only 1 option under it. You can change the address of your blog from Blog Address. Moreover, if you want to use your own domain, ie custom domain, then you can setup a 3rd Party URL for Your Blog by clicking on it.
Permissions – There are 2 more options under it. By clicking on the Add Authors option under Blog Authors, you can take the author of your blog home if you wish. This is called Guest Blogging. If you click on Send with the e-mail ID of the person you want to be the author of the blog, the request to be the author will go away. If he accepts your request, he will also be able to write articles on your blog. However, he will not get permission to change any type of settings of your blog or will not be able to.
Blog Readers – This is made public by default. So it doesn’t have to change. But here too you will find two more additional options. You can make your blog private if you wish. In this way, the blog will be seen by anyone other than you.
2. Blogger Posts and Comments Settings Introduction:

Posts – There are 3 more options under it. Write as many posts as you want to show on the home page of the blog at Show at most.
Post Template – Different Css styles are used here to customize different posts. I will discuss this in detail in a later post.
Image Light Box – Clicking on the image of your post through it will show the image as Light Box. It is usually selected Yes. If it is No, you have to click on the Back button of the browser to return to the post after clicking on the image.
Comments – There are 6 more options under it. Comment Location is usually Embedded. There are also a number of options that you can see for yourself. Who Can Comment Select it as you like. Select the Comment Moderation option as you like. However, if you keep it Always, you will have to approve the comments again and again. Then give your choice of Show word verification and Show Backlinks. Finally you will get a box in the place of Comment Form Message. Here you can write your blog comment policy or rules.
Blogger Settings Introduction Episode-2 :6
Here we will discuss the two options of Settings, Mobile and Email and Language and Formatting
01. Blogger Mobile and Email Introduction:
Mobile – If you want to post a blog via mobile, you can activate the option by clicking here. We will discuss this in detail later.
Email – There are 3 more options under this. If you also want to post via Email, you can turn on the Posting using Email option. Write your email address in place of Comment Notification Email. Google will notify you of all types of notifications in this email. Email to Post option when you turn on the Posting using Email option. Otherwise it will not work.
02. Blogger Language and Formatting Introduction:
Language – It is better to keep English in the first option. But you can choose your choice if you want. Enable Transliteration means the language you want to translate.
Formatting – There is nothing to say here. If you are in India, you have to make the options as shown above. If you are in another country, you will set the time according to the time zone of that country.
Blogger Settings Introduction Episode-3
In today’s post we will discuss the two options that you can see marked by the red mark in the image above. Although the Other option is not so important among these two options, the Search Preference option plays a very important role in search engine optimization.
01. Blogger Search Preference Introduction:

Meta Tags – Here you can write a short description of 155 characters to match the content of your blog. These keywords will help search engines get an idea of the content of your blog.
Errors and Redirections –
There are two more options under this. You can create a custom page instead of Custom Page Not Found. As a result, if someone enters a wrong link in your blog, you can give him some directions. This is called 404 Error Page. You can learn more about Custom Page Not Found here. With the Custom Redirects option you can move from one link to another. This type of link is usually used when a link becomes so old.
Crawlers and Indexing –
These two options are very important for search engine optimization. You will see a message above the two options that if you make one of these erroneous settings, search engines may ignore your blog. So it is important to know well before launching these two options. We have discussed these two options in detail earlier. What or why and how to add Robots.txt file to the blog and another post Blogger Custom Robots Header Tags Settings
2. Blogger Other Options Introduction:

Site Feed – There is nothing to do here. If you want to redirect your Blogger Feed to Feedburner.
The rest of the options are not so important. But you can use the Google Analytics option here. We will discuss this in detail later.
Blogger Miscellaneous Part Introduction:
Pages – This part is just like the Posts option. There are usually various cleansing songs about the blog. For example, different pages are created about your blog, about yourself, about the policy of the blog, contact pages, etc.
Comments – How many comments have been made on which post of your blog, which comments are used to delete, approve comments and delete spam comments. You can easily understand the issues by clicking here.
Earnings – If your blog is good quality and has a lot of visitors, then you can earn money using Google Adsense Approved Advertisement on your blog. However, it does not support All Languages yet. To get Adsense Approved, your blog must be in English or Google adsense support languages, We will discuss this in detail later.
READ : How To Make Money Online And Quit Your Job?
Campaigns – This is basically a part of Google AdWords. You have to have a lot of experience to use it. It plays an important role in search engine optimization.
Conclusion:
I believe that if you read this post well, you will get a complete basic idea about Google BlogSpot blog. Because the way we have analyzed each issue should not be a problem for anyone to understand. Even then, if you have trouble understanding any part, you can let us know by commenting. And if you want to get the full idea about blogs or you want to be a good blog designer, stay with us. We will always give you something new about blogging.
So let’s Create A Blog on https://Blogger.com
Thank you