Last Updated on September 28, 2021 by admin
How To Submit And Verify Website In Alexa
How to Submit and Verify website In Alexa? An easy way to build a connection with Alexa by submitting and verifying a blog on Alexa to increase Alexa Traffic Rank.
Read : How To Earn Money Online Without Investment At Home
What is Alexa Ranking? And How to submit website in Alexa.
Alexa Ranking is one of the most famous and popular way to know about your website popularity . You know Alexa check a website’s past 3 months data of, Traffic, and visitors engagement. Alexa is global Ranking system of millions of website.
Step by step How to submit And Verify Website In Alexa :
1. Search Alexa.com on Google.
2. Register a free Alexa account
3. Check your email for activation link. Then click and confirm registeration.
4. Login your account, then go for dashboard.
5. Claim a site.
Then
6. Enter your url of the website.
Then verify your website.
Alexa is currently the most used and important ranking system for ranking a blog / website. Webmasters prefer Alexa because Google PageRank has not been updated for more than two years. In the last post we wrote about the importance and necessity of Alexa ranking as well as how to increase Alexa Traffic Rank? That’s why I don’t want to write about the importance of Alexa again. However, before reading this post, you must read the last post from the link above.
Read : How To Start A Money Making Blog On WordPress
Learn SEO Online Free Step By Step
To increase Alexa Traffic Rank, first you need to verify your blog by submitting it to Alexa site. Then a connection of Alexa will be made with your blog. As a result, Alexa can easily collect information on various topics of your blog.
How to Submit and Verify Blog on Alexa?
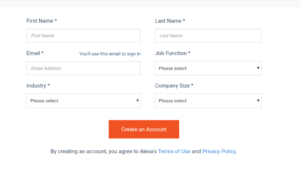
First you need to create a free account at Alexa.Com.
Fill up the form in the image below to create an account.

After filling in all the above information, click on the green Create an Account button.
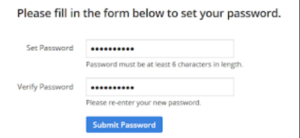
After clicking the Create an Account button, a link will be sent to your desired e-mail address. Then clicking on the link, you will see the option to setup password for your account as shown below.

After setting up the password as shown above, you can create a free Alexa Account by clicking on the blue Submit Password button.
Then click on the Claim option from the bottom of the Alexa Website or directly click on the Alexa Claim link.
After clicking on the Alexa Claim link you will see the image below.

In the image above, you can see the image below by clicking on the blue Continue button with the Url of your desired blog.

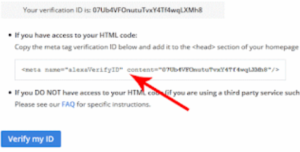
Click on the round Method2 option from the image above to see the image below.

Copy the meta tag (complete line) marked with arrows in the image above.
Then login to Blogger Account and click on Template> Edit HTML of your desired blog.
Now search the <head> part by pressing Ctrl + F from the keyboard.
Then paste the copied Meta Tag under the <head> tag of the template and save the template.
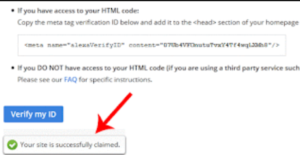
After saving the template, click on the blue Verify my ID button in the image above, your blog will be submitted to Alexa and you will see a Success message like the image below.

See the image above showing the Success message of the blog being added. If you see the Success message in the image above, you will understand that your blog has been successfully added. Otherwise you will realize that you have made a mistake somewhere.
How to submit and verify your website in alexa
Conclusion:
Ask for help: A blog describes all the steps to submit and verify in Alexa in the simplest way possible. We have not left out any part here. If you follow all the steps in our description, you will have no problem submitting your blog to Alexa. So If you Read the full article carefully then you will get the full knowledge about this.
Even then, if anyone has trouble understanding any part, you can let us know by commenting.
I hope you understand the topic,
How To Submit And Verify Website In Alexa.
Like and share the post.
Thank you.
